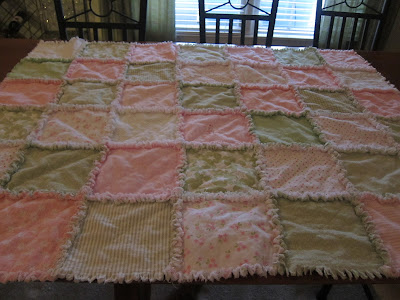
Every now and then I get a hankerin'. Do you ever get one of those? My most recent was a hankerin' to sew. For several years of my life, when the boys were young, I sewed EVERY SINGLE DAY. It was my sole creative outlet and the one part of my daily work that no one could "undo" as soon as I had done it. It brought the satisfaction of a visible, tangible, finished product...something we moms of young ones often miss out on. As the boys have grown up and I, in many respects, have more free time than ever before, I have nearly abandoned all creative outlets...probably because I have focused almost exclusively on writing. Anyway...here is the project I began and completed in fewer than 24 hours!
I started with this stack of storebought flannel baby blankets which I have accumulated over the past 4 years in anticipation of this project:
Using these highly sophisticated tools: (cookbook, pencil and scissors)
I marked and cut out 84 squares:
Which I then laid out in my preferred pattern: (Blogger insists on rotating this photo...awkward...sorry!)
I failed to take a photo of this next step, but each "block" requires 2 squares of identical fabric which are placed back to back (wrong sides together) so that both sides of the quilt end up with a "finished" look. I chose to sew each block's front and back together with an "X" pattern - on the machine with a stitch length of 5 - before I did anything else. This step is not necessary for the end product to work...it was my own little variation, so feel free to skip it!
Next, I sewed 7 rows of 6 blocks each, then attached the 7 rows together. On this type of quilt, all the seams are exposed! You need to use a fairly small stitch so that your seams are very strong!
Seams need to be strong, because the next step is to clip every single seam down to the stitching at 1/8" - 1/4" intervals, like this: (I wish I had done mine slightly closer than I did for a better fray!)
Of course, make every effort NOT to clip through any of your seams...but if you do, it's not the end of the world...you'll have to make a simple repair, that's all.
Your final step is to launder the quilt! (I forgot to mention that you MUST NOT launder your flannel beforehand or this will not work well!!) After you wash your new quilt, I suggest taking it outside and shaking it vigorously to rid it of many of the loose fibers from your "shredded" seams. Then dry the quilt in the dryer, checking every 15 minutes or so for excess build-up in the lint filter.
When the quilt has dried completely...DO IT AGAIN! You want those seams to be as frayed as possible and each washing increases the fluffiness of the seams. Your end product should look something like this:
This is one of the easiest projects I've done and I was pleasantly surprised at how little time it required start-to-finish! Try it...you'll like it!


7 comments:
oh, that's so cute! I like the frayed fuzziness. Pink and green together is a good choice too.
Lori Domesticus!
i so totally want that quilt!! i need a sewing machine first tho....i also need to sew curtains...
Thanks, Oriana...you're always encouraging!
Randy...haha!
Rebekah, does anyone in the family have a machine you can borrow?? In a week or two, you could finish BOTH projects! :-)
A friend of mine made a few of these with denim (old jeans) on one side and flannel on the other. Her older boys love them.
Cool. I like this a lot. Good job!
Very nice! And good to see you blogging again.
Post a Comment